

Fragile food supply systems, bioregionalism, and planting the Three Sisters: Pt 2
Adapting Irrigation for a Warming Climate
For irrigation I had been considering the system we’ve used to irrigate our orchard; the Drip Stake system which uses a 1” polytubing line with ¼” branches and drip emitters to fill hard plastic stakes that are hammered into the ground, and capped off with the emitter inside. Modeling this scenario with the amount of stakes we would need to sufficiently irrigate this square footage made the numbers in my mind add up quickly to equal somewhere beyond my means. I decided to do what any farmer would do and consult Google Gemini on irrigation methods that would
- Be subterranean (and thereby drought hardy)
- Minimize plastic consumption
- Distribute water sufficiently
- Be simple enough in design to think about clearly
- Be cost-effective
My consult with Gemini provided some suggestions; DIY Clay Pipe or Sub-Surface Hugelkultur (“hill culture”). Though at this point, I was feeling weary of the task, and considered shaving off 14’ to leave a 11’x20’ plot 😅. Here’s the table it provided to examine trade-offs.
Comparison for an 11ft x 20ft Plot
| Feature | DIY Clay Pipe | Sub-Surface Hugelkultur |
|---|---|---|
| Plastic Content | Near Zero (only the intake cap) | Zero |
| Initial Effort | Moderate (trenching & laying pipe) | Heavy (deep digging) |
| Water Source | Needs manual or rainwater refill | Relies on rain/occasional deep soak |
| Longevity | Decades | 5–10 years (until wood decays) |
I initially opted for a clay pipe system and explored the purchases and handiwork involved with the help of the handy AI (you can read the full conversation here) However, I instantly hit a formidable roadblock: the pipes come in 4’ sections, with no clear way to seal off the ends. As I was contemplating various kinds of caps I could use, and how I might accomplish the daunting mortaring operation required to run 3x 34’ in 4’ sections, I realized the task was beyond my means. Backing up I re-read the Hugukultur method and made some cursory searches for inexpensive, subterranean drip hoses. I did some research on polytubing to ensure it does not emit PCBs or Phthalates to appease my reluctance to use plastics. I remembered a large pile of wood chippings that a friend and I had collected a couple of years ago and piled in the backyard. Decomposed from the elements, it was now quite spongy and that’s when the vision crystallized:
- Three trenches, each with a shallow layer of this spongy matter at the bottom
- Drip hoses running the length of each of the trenches
- A spongy layer on top, forming long subterranean sponges that tap roots could reach into during the dryer parts of the summer for sustenance.
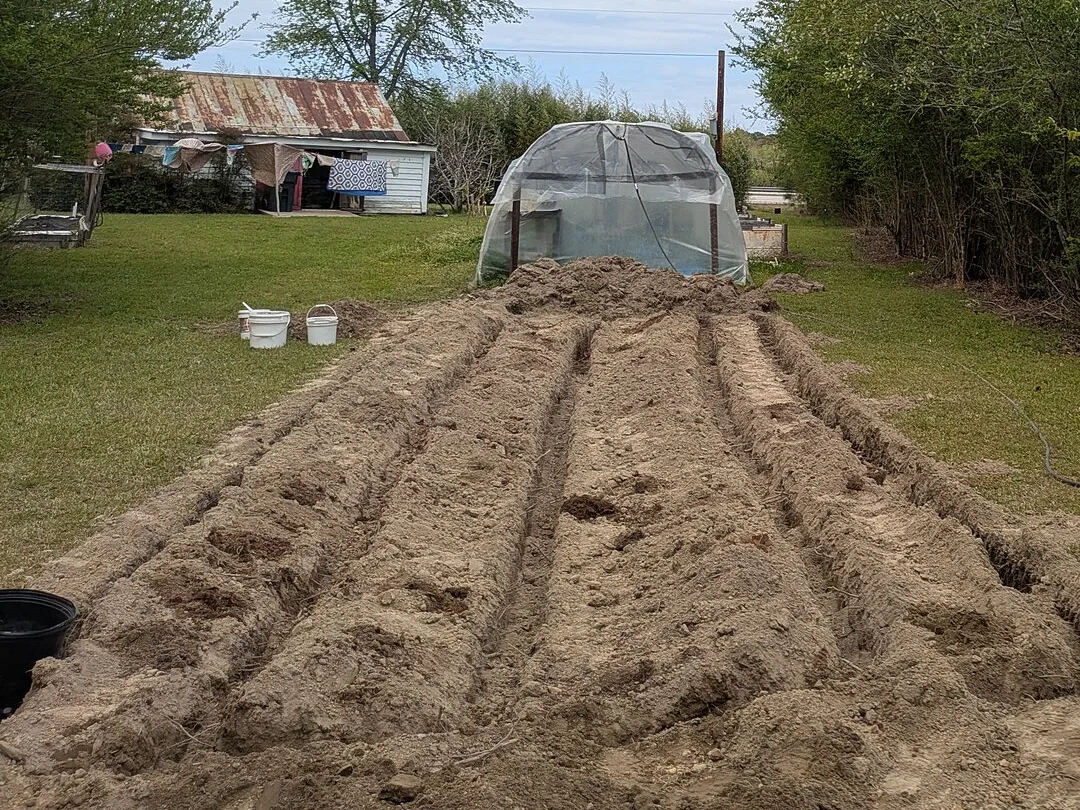
Now I needed to make the trenches. Looking at the trenching shovel and imagining squatting and lifting with my legs for hours on end to make 3x 34’ trenches made my low back tremble. This was definitely a task that could be better done with a machine without much risk of causing major damage to the microrhizome layer outside of where the trenches would be. Side note: damage to the microrhizome layer was the deciding factor for choosing not to just till this plot.
The problem with the plan of bringing in machine labor was that my dad had totaled his truck a few weeks earlier and so I had no way of transporting the trencher. I remembered neighbors of ours, Mark and Molly, had used a trencher to run plumbing lines when he was first moving into his home so I decided to reach out. Mark didn’t have a trencher but generously offered to transport one on his trailer if I gave him a day and a time that week since he was retired and didn’t have any pressing obligations. This neighborly gesture of kindness stoked some wind in my sails and I scheduled the trencher for the following morning. Out to the rental place bright and early, we managed to get the trencher back by 9a and I was done trenching by 10:30. (Had I attempted this task manually, it would’ve taken several days, if not a week).
I laid 6 trenches: One at the top for the irrigation distributor, one on each long edge, and three at 2.5’ and 5.5’ from left, and 2.5’ from right for the irrigation runs. I had intended to bury tin sidewalls for the bed with the long edge trenches, but realized that the 4” trench itself provided a substantial live edge of sorts, making the tin walls superfluous. (Realizing you can eliminate, rather than add more steps to a garden project, is a special kind of sweetness!)
With the expediency with which the trenching happened, I was enthused and endeavored to venture to the hardware store to pick up the supplies to get started with the irrigation build out. Before doing so I had an inkling that I should give my mental model/parts list a once-over to confirm my intuitions. Turns out it was a bit fuzzy – so I decided to sit down and sketch out the system on some graph paper.
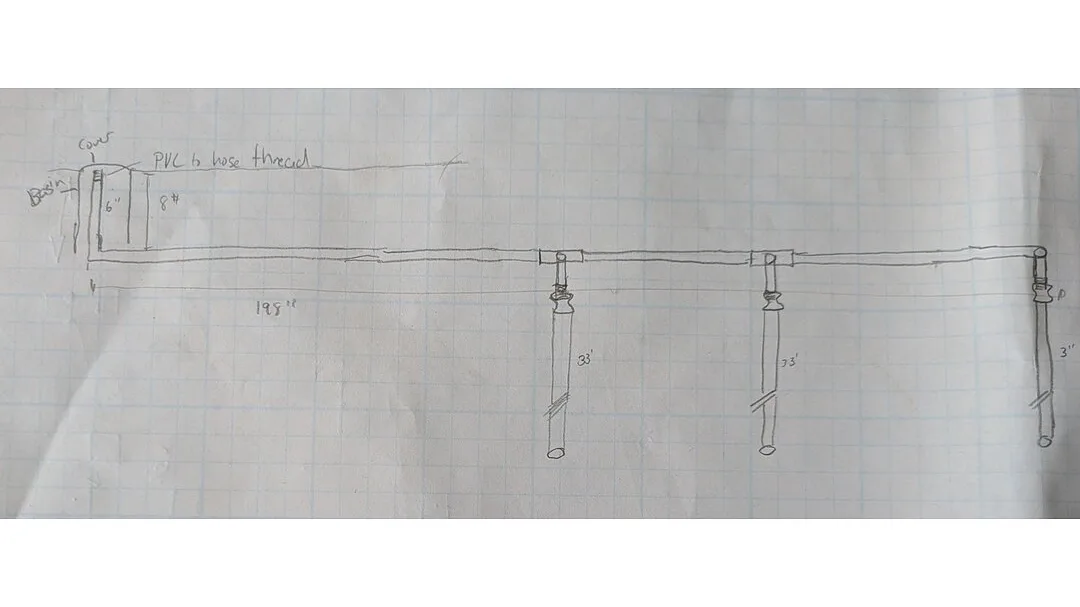
Now with my counts and lengths right I felt more confident I’d only need one visit to the hardware store. I found all the PVC parts I needed pretty easily and also found a 100’ drip emitter hose; this is basically double-layered polytubing with washer shaped disks sandwiched between the poly tubing layers, which function as drip emitters. Driving Nicole’s roller-skate sized Honda Fit to the hardware store left me worried when I reached the parking lot with two lengths of 10’ PVC, given the last time we tried to fit a 10’ pipe in her car, we shattered the windshield and had to buy a new one. Noticing the sun roof, I decided to crack it open and send the PVC lengths from the corner of the trunk out the sun roof on an angle such that the Red Fit looked like some kind of lopsided lady bug with white antennae out one side of its head bouncing in the wind. (There’s a reason most farmers drive large trucks!)
It did the trick though, and I arrived back at home without any broken windows.
Irrigation Installation: Finding Flow with Greater Awareness
Though I felt the installation of the irrigation was going to be difficult, I decided not to wait and move forward with it that afternoon. This week I also happened to be on a working meditation retreat with the Mindfulness in Daily Life (MIDL) community which allowed me to clear my schedule for more meditation and this substantial project. I began my work on irrigation with a meditation led by my friend Monica Heiser. Her persistent invitation to relax into awareness made me really aware of how my expectations that this project was going to be difficult was actually making it difficult. My squatting posture was needlessly awkward and strained. I was squinting even though the skies were overcast. And my breathing was stilted and uneven. Becoming aware of these aspects enabled me to find a place of ease. What could have been a demanding and error-prone endeavor became a smooth and seemingly effortless consistent work period that culminated in the completion of the system in a couple of hours.

The system is a short length of hose attached to an irrigation timer. The hose is coiled into a half bucket we found in the logging yard next door, and repurposed to provide a container for the irrigation inlet cover. The PVC runs directly out the short side of the bed with two T and one 90° end, cemented to threaded ends where the poly drip tubing attaches.
The next day Nicole and I layered on the top layer of spongy matter and then filled the trenches with dirt. I went along the unbroken earth in the bed and used a pitchfork to aerate the compacted dirt and make it easier for roots to penetrate.

Now it was time to enrich the top soil which Nicole and I set out to do by spreading wheelbarrow loads of biochar from the firepit across the surface. Biochar provides a host of benefits to a garden.
-
Improves Soil Structure Its porous texture helps create fluffy, aerated soil—especially helpful for heavy clay or compacted beds.
-
Retains Moisture Those tiny pores act like sponges, holding onto water and slowly releasing it as plants need it. Perfect for drought-prone gardens!
-
Boosts Microbial Life Biochar provides shelter for beneficial soil microbes—the invisible allies that help break down nutrients and keep your plants healthy.
-
Reduces Nutrient Leaching It acts like a sponge for nutrients too, helping prevent fertilizers from washing away during heavy rains.
-
Long-lasting Unlike compost or mulch that breaks down over time, biochar stays in your soil for hundreds (even thousands) of years, continuously improving it.
On top of the biochar we added a layer of composted horse manure in hay straw from a stable and used pitchforks and shovels to mix the amendments into the soil.
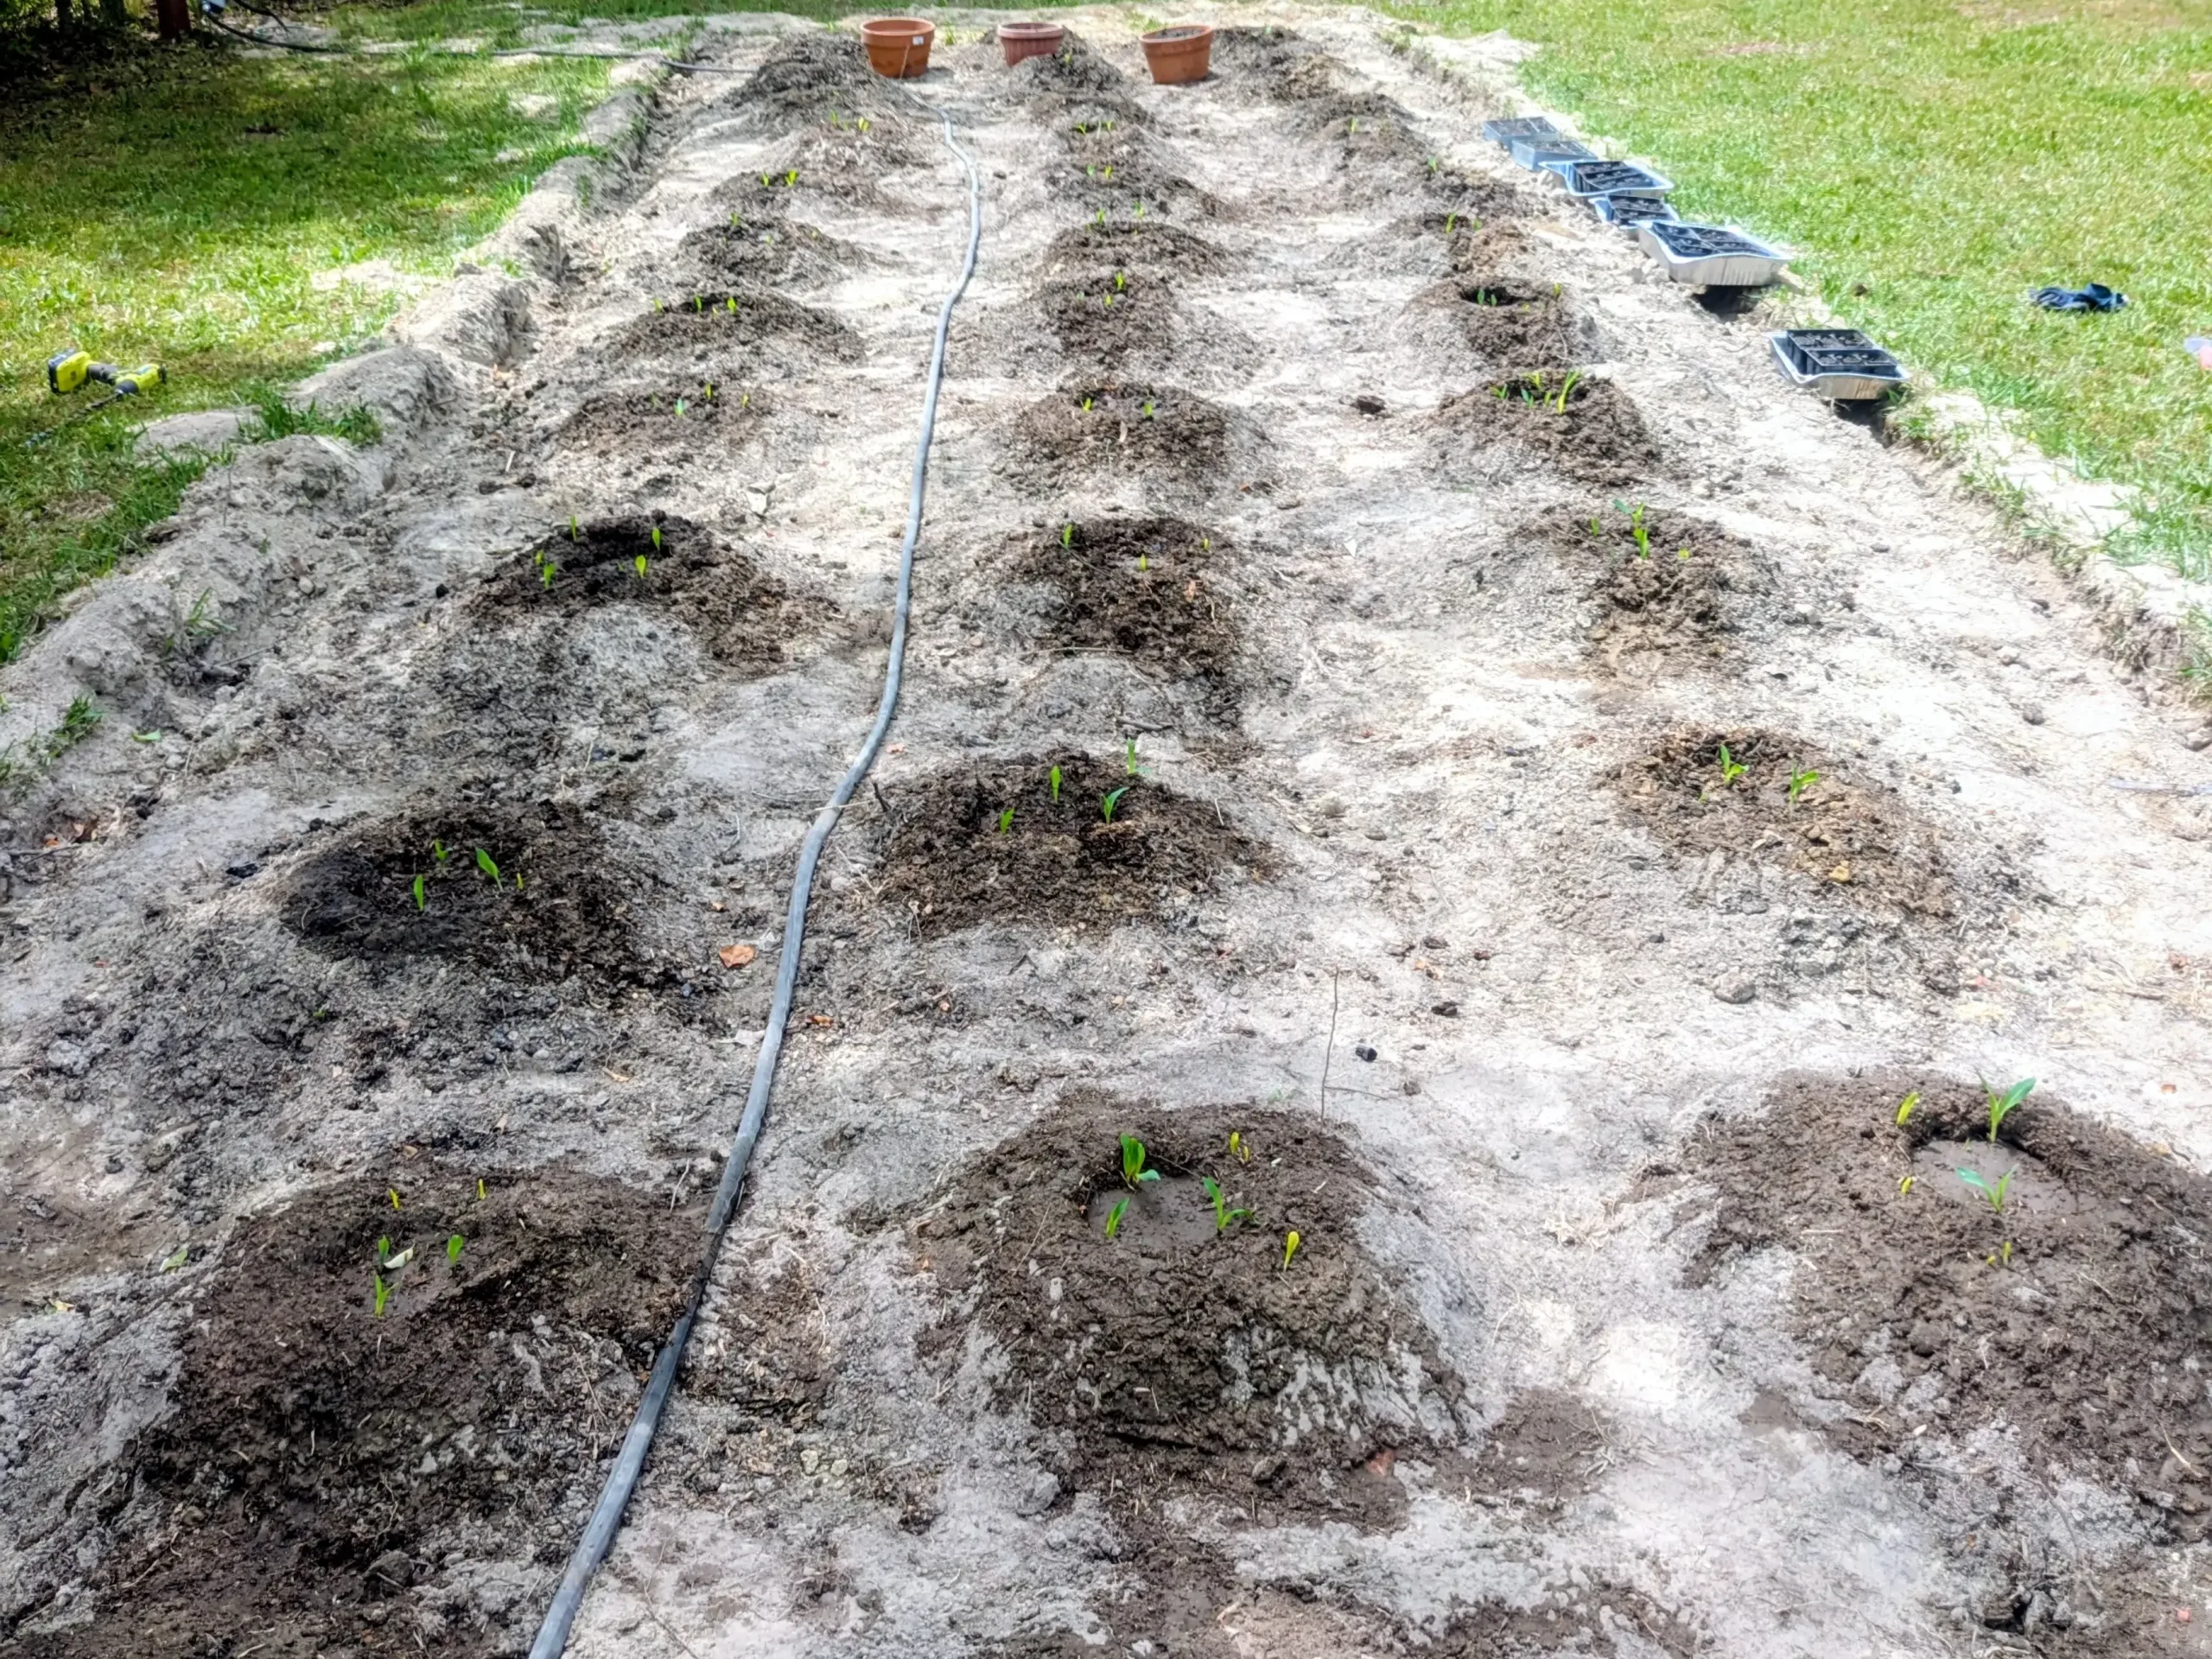
All the while this has been going on, we’ve been using a screen square to sieve the dirt held by the grass squares back into the plot. As the dirt dries in the sun, we slowly but surely reclaim the dirt, and hopefully some of the microbiome too. We used that dirt to make the mounds on which each of the Three Sisters patterns will be planted. It took a couple hours each morning for us to finally reclaim all of the dirt, make and plant all of the mounds.

After making the mounds we made holes in a Star of David formation ~3″ deep and planted ~6 kernels in each mound, 1-2 in each hole.

After watering the mounds for two days I observed that most of the water was running off the top of the mound and likely not soaking the soil sufficiently to moisten the soil around the kernels. To improve the water retention at the top of the mound where the kernels were planted I molded the mounds into mini-volcanoes. Watering now consisted of putting a spray head inside the volcano opening with a wide cone setting such that the water hit the walls and the opening filled with water, slowly sinking into the dirt over the next couple of minutes. This made water much more efficient and led to a lot of healthy sprouts coming up starting within 48 hours.
Symbiosis: Corn Stalk Scaffolding for Nitrogen-Fixing Legumes, and a little bacteria called Rhizobium
I was fortunate to receive a tip from fellow meditation teacher and organic farmer, Brad Constable, to use rhizobium inoculant when planting the legumes. Rhizobium is a bacterium that forms a symbiotic relationship with the root nodules of legumes to provide nitrogen fixation in the soil where the legume can access it as it grows. Concurrently, all plants need nitrogen to grow and thus forms the symbiotic relationship between the rhizobium, legumes, and corn. Scarlet runner beans can fix up to 125 lbs of nitrogen per acre, which is roughly .003 lbs per square foot (Armstrong et al.). The legumes don’t consume all the nitrogen, leaving plenty for the corn to tap as it grows its stalks skyward – simultaneously providing a structure for the vining legumes to wind their vines up for greater access to the sunlight. I’ve put in an order for more Scarlet Runner beans and rhizobium inoculant.
A week has elapsed and we have a lot of germinated corn! Some mounds have corn sprout crowding (visible in the pic below) so we did some surgical extraction of the seeds by gently excavating the root structure of the sprouts.
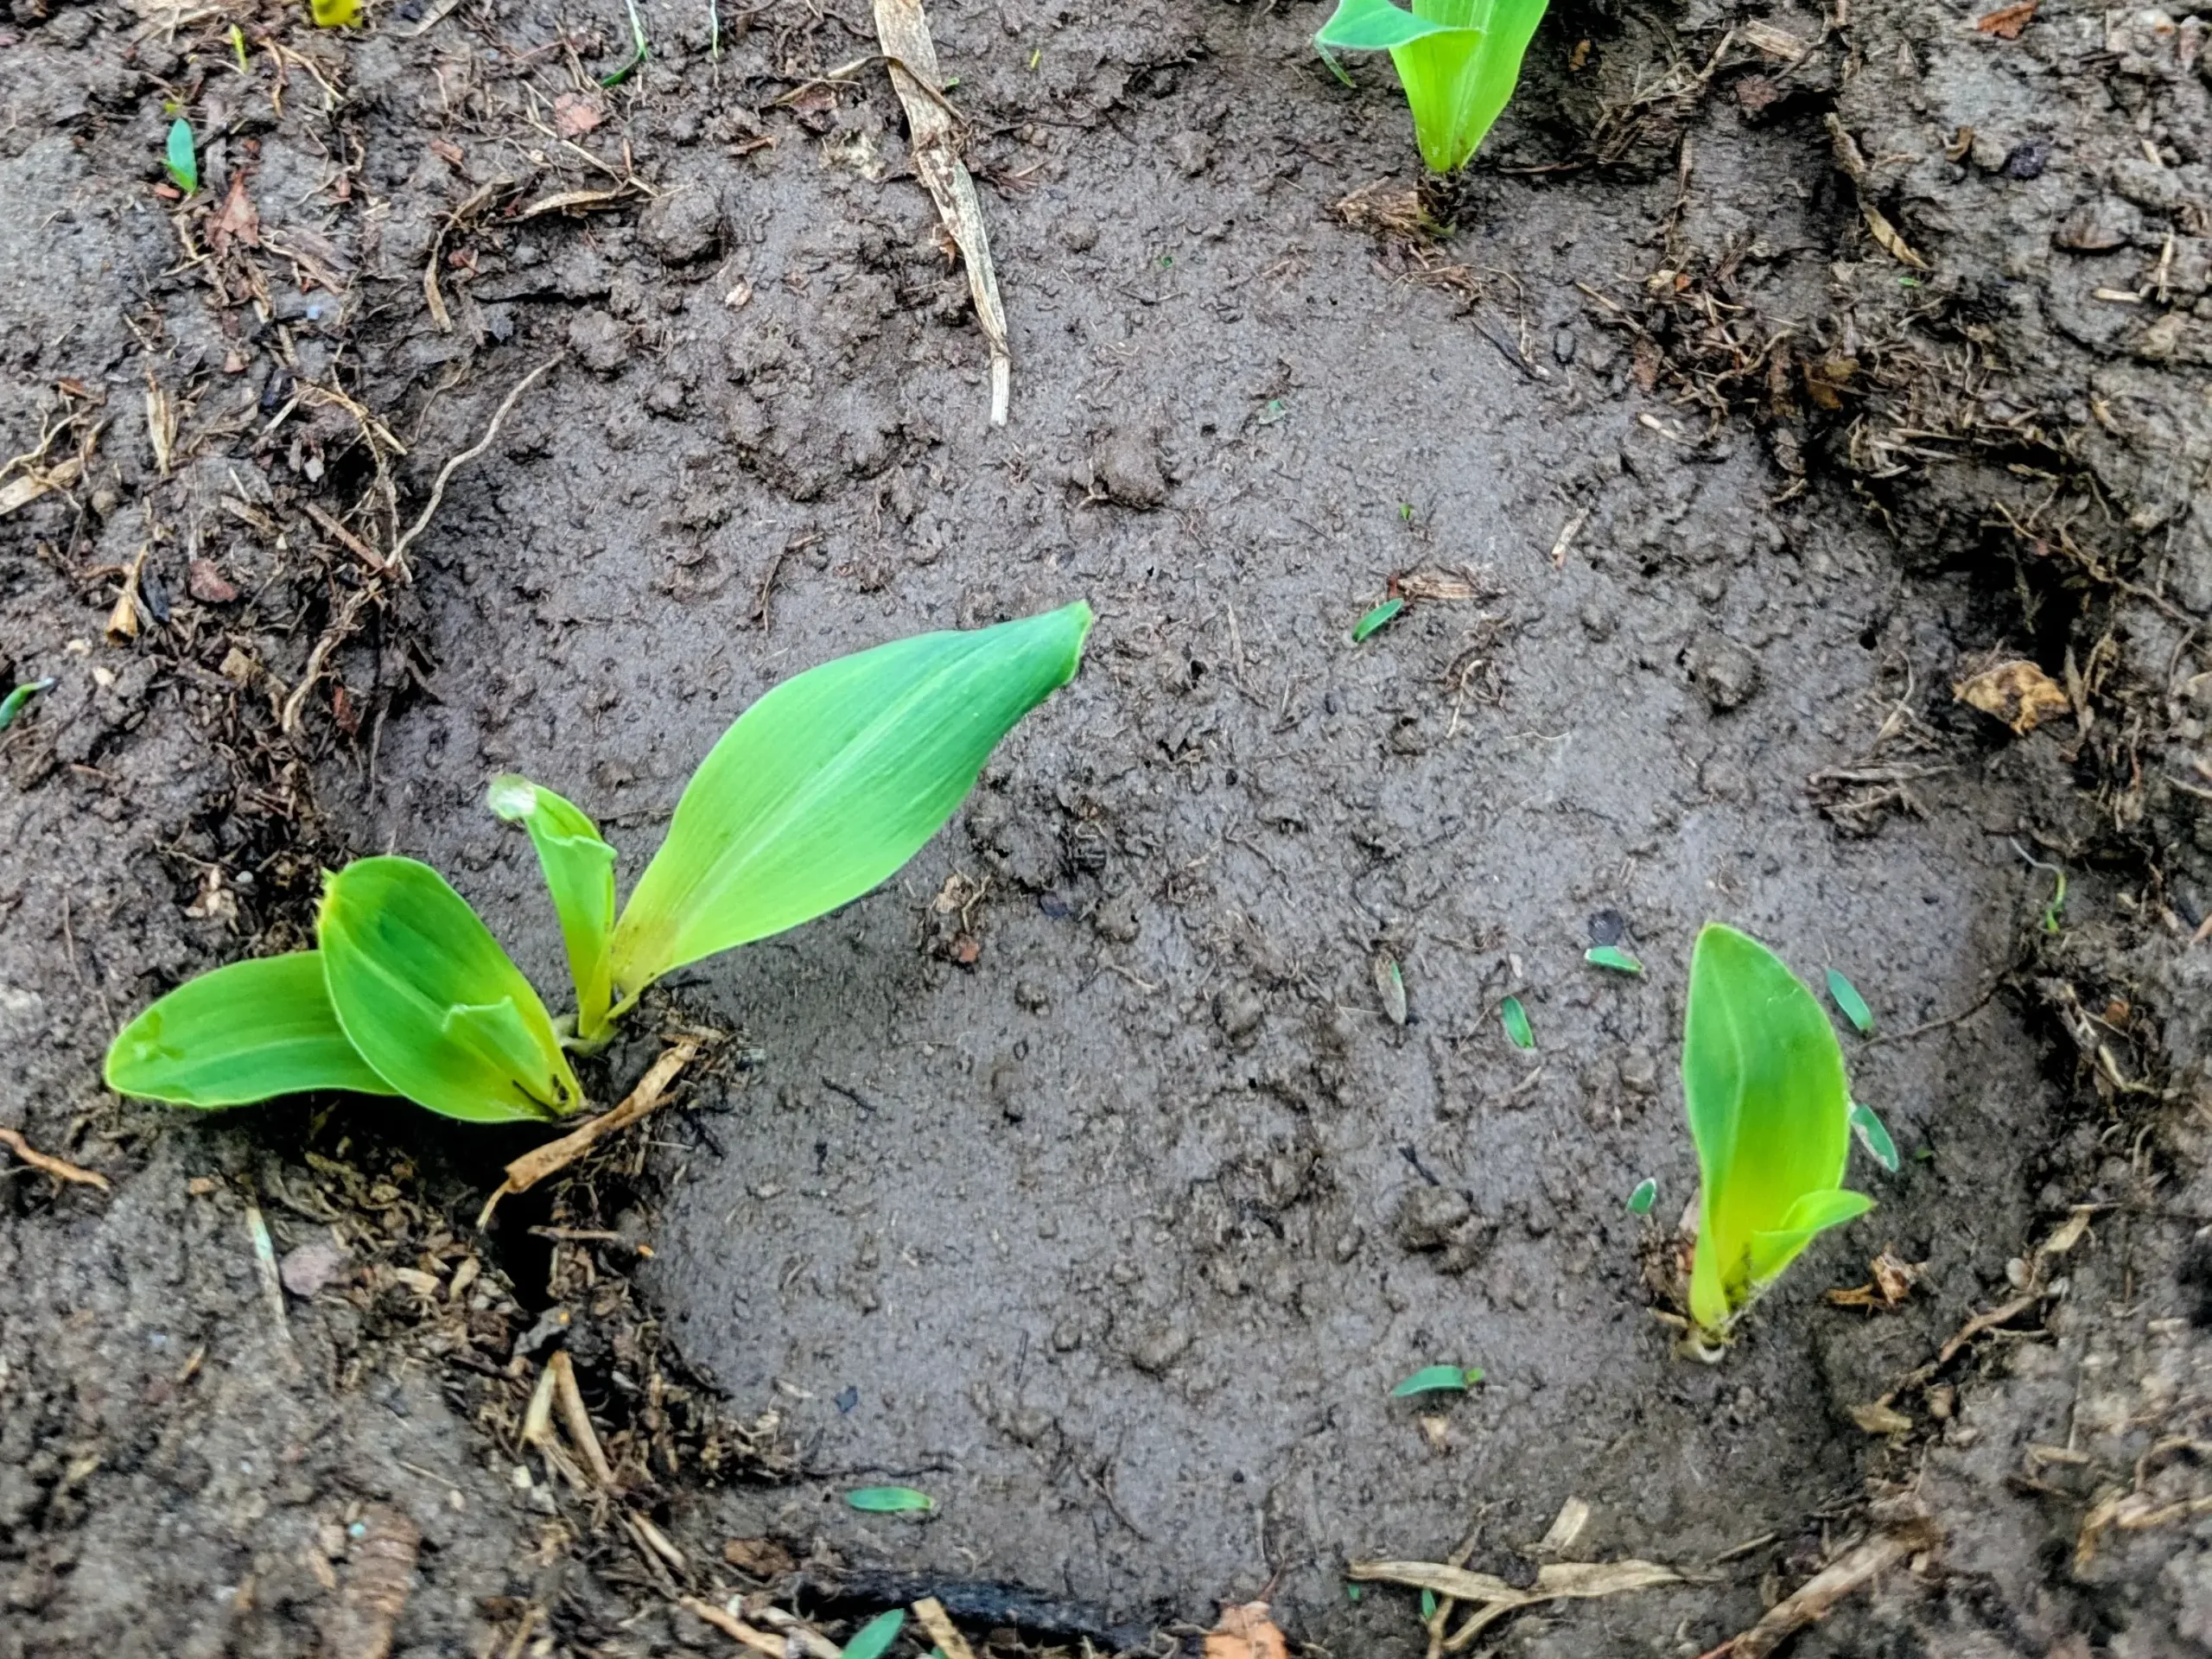
Corn roots seem to consist of long furry tap roots and a couple of notably long horizontal running roots. If you’re careful, you can palpate and dig around them to get them entirely out without ripping them. In the mounds with fewer sprouts we used a drill with a ¾” drill bit to drill holes for the tap root and some branched holes for the horizontal roots. We then carefully transplanted the sprouts into the mounds such that each has at least three sprouts in it. We noted that most of the corn seems to be sprouting at the end with more shade, which is likely due to the moist conditions of those mounds since they retain moisture better in the dappled shade of the hedgerow.

We chose cow peas and Scarlet Runner beans as our nitrogen fixing legume complements for the corn. We drilled the holes for the legumes around the central crater with the corn sprouts. We counted out roughly 6 peas or beans per mound (we ultimately used a couple more on the larger mounds) to combine with the rhizobium inoculant. We used distilled water and sugar (to get the peat to stick to the legume) on the beans to prepare them to plant, being careful not to expose the slurry mixture to direct sunlight since the rhizobium are sensitive to UV light. As we planted the beans we employed a culinary dropper (pictured below) to drop 2-3 drops of excess liquid slurry into each hole with the planted legume and promptly covered it with some fertile soil. We watered in the planted legumes and freshly transplanted corn with Miracle-Gro to give them an added nutrient boost for germination.
Nicole created some start trays with fertile soil from the greenhouse where she planted squash seeds. Once sprouted the squash will be transplanted into the sides of the mounds as the final phase of the Three Sisters planting.
Tonight we’ll fill the craters with water to make the mounds moist for the sprouting of the beans. I’m also hopeful that by watering in the center of the mounds as we’re doing with this crater method, the roots of all the plants will grow towards the center of the mound – encouraging an entwinement of roots that dispense nitrogen to all of the plants efficiently.
We hope that this was informative and inspiring and that you’ll follow our experiment with the Three Sisters as it progresses!
Did you find this article informative? Consider leaving a tip below.